


The life of a chemist is often filled with challenges. One of the largest challenges any chemist can face is the purification of a mixture. Let’s say you just finished running a chemical reaction. It’s been cooled down to room temperature, and you’re staring at about 100 grams of a clear liquid sitting in the flask. Chances are, it’s not going to be 100% pure. Your boss wants to sell your final product to a customer and is pressuring you to get it pure. What do you do?
First, consider the problem. What are the possible items present? Hopefully, you have some of your product in the flask – otherwise running the reaction was pointless! You can’t just sell someone an impure compound, though. Maybe what you synthesised is going to be used to make a new drug, or maybe it’s going to be added to food in a factory to help give it the exact taste that everyone loves and has come to expect from that brand. You have to get your compound pure, or the drug could be contaminated, and the food won’t taste right.
Distillation is a method of purifying liquids based on their boiling points. If you have a mixture of multiple liquid compounds, all of which boil at different temperatures, distillation is probably your best bet for a powerful but economical method of separation. So, let’s take a look at the basics of distillation – the theory behind it. Then we can take a look at how you would actually do this in a laboratory setting. Finally, we can finish with a look at how distillation is all around us, and how companies are using distillation to enrich our lives with high-purity compounds.
Distillation isn’t new. The technique has been around since ancient times. Alchemists in ancient Egypt were using it to purify drinking water. Residents of Italy used it in the 9th century to purify drinking alcohol. Remains of “stills” (the physical setup required) from ancient distilleries have been found dating back to 12th century China. We’ve known about distillation for a long time, but it’s only been in the last few hundred years that we’ve understood the science behind it – how it actually works.
You know from making tea or pasta at home that you can heat up water on a stove, and eventually, it will boil. Water has a specific temperature at which it boils, the boiling point. At sea level elevation, this boiling temperature is 100°C. The liquid water in the pan has a certain vapour pressure, which depends on its temperature. The outside air has pressure, which changes depending on your town’s elevation. When these two pressures are equal – when the vapour pressure of the water (which has been driven up by the heating process) equals the outside, atmospheric pressure, the water begins to boil.
The water will try to boil before reaching this temperature, but the outside pressure from the air around us crushes the bubbles and we don’t observe any boiling. It’s not until the boiling point is reached that the bubbles can escape, and water molecules can start to escape the surface of the liquid in great numbers. This is observed as steam coming out of the pan, and of course, if you boil the water for too long, eventually all the liquid will boil away.
Now, imagine starting again with a fresh pan and some new water, at room temperature. Suppose you add an equal amount of some mystery liquid to the water already in the pan. You’re told that this new mystery liquid has a boiling point of 50oC. What will happen as you start to add heat?
There’s a principle in chemistry called Raoult’s Law. It states that the vapour pressure of a solution is dependent on the amounts of the various solutions that are present, and the vapour pressure of each component of the solution. We can combine this with Dalton’s Law, which states that the total vapour pressure of the solution is the sum of the partial pressures of each individual liquid in the mixture. So, let’s go back to our pan. We have two substances, water and our mystery liquid. Our mystery liquid is more volatile than water, as it has a lower boiling point. As we start to add heat, the mixture will start to boil, and we’ll see vapour start to escape the surface of the mixture.
This vapour will be a mixture of water and the mystery liquid. The amount of each, the ratio, is enriched in the more volatile compound – the mystery liquid. This is due to Raoult’s Law. So, we start to boil away the mystery compound first. Because the mystery liquid is escaping the pan faster than the water, the liquid remaining in the pan (that hasn’t yet boiled away) starts to become enriched with water, as we’re losing more mystery liquid than water through evaporation.
Hopefully, the difference in vapour pressure (the difference in boiling points) between water and the mystery liquid is large enough that we can ignore the tiny amount of water that starts boiling away early, with the mystery liquid. Usually, about a 10oC difference between two components is plenty and you can use distillation to create some high purity material. We have 50oC of separation in this example, so we’re in good shape.
As we continue to add heat, the lower-boiling mystery liquid will continue to escape the pan as vapour. Once it’s mostly gone, the temperature in the pan will rise, and eventually reach the boiling point of water. At that point, we’ll start to have a lot of water vapour escape the pan. If we leave it on the heat long enough, eventually all the liquids will disappear.
Described right there, in the last four paragraphs, is the strength behind distillation – it’s secret. It’s the same secret that was jealously guarded by Egyptian alchemists and our ancient ancestors. Did you catch it? Let’s take a closer look.
We started off with a mixture of liquids: water, and a mystery compound. We heated things up, and the mystery compound came off as vapour. We kept heating, and the water came out of the pan as vapour, leaving us with an empty pan.
That doesn’t seem very exciting. Let’s change something. Instead of letting all the vapour just fly up into the air and escape into our kitchen, let’s come up with some way of…capturing, that vapour. Now, steam can take up a lot of space – just a little bit of hot water can fog up a room pretty quickly. So, we don’t want to keep it as a vapour for any longer than necessary. Let’s say we cool down the vapour right after we collect it. What would that look like? The unknown compound would boil away as vapour, and we’d collect the vapour and condense it – cool it down somehow, so that it turned back into a liquid and dripped into an empty pan off to the side somewhere, on the countertop. Then, when the water started boiling (after all the mystery liquid was sitting in the pan on the countertop), we could switch out the pans on the countertop. The water vapour would come up, be cooled/condensed back to a liquid, and drip into our fresh pan.
We end up with two pans! One has purified water, and one has purified mystery liquid. We started with a mixture in the pan, and by using heating/cooling / some clever technique, we’ve separated them. This is the essence of distillation. We can take a mixture of liquids, and as long as their boiling points are more than about 10oC apart, we can add heat and collect each liquid (one by one) as pure compounds, in separate containers.
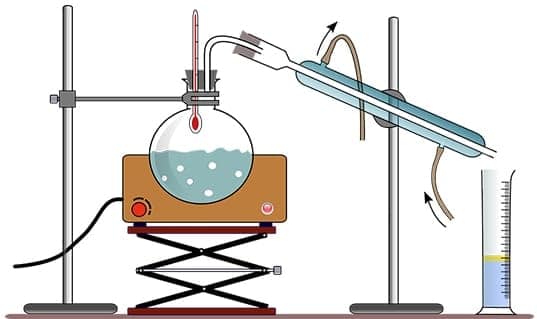
Let’s take this beyond the kitchen and go back to our original scenario, where you’re a chemist. You have an unknown mixture of liquids in a flask, and your boss wants it purified. You can use distillation! We don’t want to use pans, or kitchen counters, because that’s not very sophisticated. Let’s get out some specialised glass. Chemists have a wide variety of glassware available to them, and they all serve different purposes. Most suppliers will sell you the various parts of a distillation set up as a single kit. Let’s suppose you have one of these kits in your lab. You assemble it according to the instructions you find inside. What does it look like when finished?
It might look complex, but don’t worry – let’s take a look at all the various pieces.
You know that you need a heat source. We were using a stove before in our example, but now we’re going to switch to a hotplate. You don’t have to use a hotplate – you can also use an electric heating mantle, which wraps around the flask like a glove and heats it up, almost like an electric blanket. Next up is the flask you started with, which has a mixture of liquids. Before sophisticated glass came along, people would use any pot they had available. Most of the time were made out of metals, like copper. Even though we’re using glassware here, chemists will still sometimes refer to the starting flask as the “distillation pot”, or “still pot”, referring to the pots used centuries ago. The apparatus as a whole is sometimes called a “still”, short for distillation apparatus.
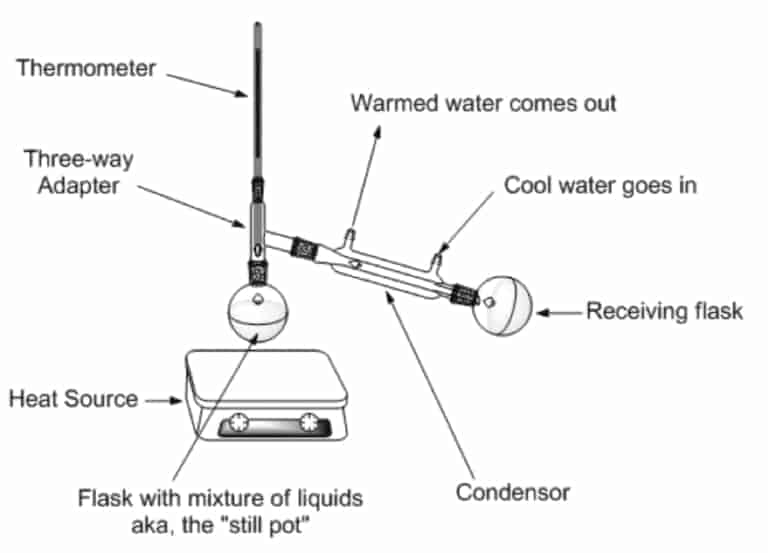
Up next is a piece of glassware called a “three-way adapter”. It’s a separate piece of glassware that nestles into the top of the flask. The “fuzzy” parts of the joints in the picture above, where two pieces of glassware meet, is where the different parts of the glassware apparatus fit together and form an air-tight seal. This three-way adapter allows vapour to go in two directions: up, or to the right.
The top joint of the three-way adapter is plugged by a thermometer. The bulb of the thermometer extends down into the three-way adapter. This allows us to measure the temperature of the boiling vapour as it rises up above the still pot. The right-hand exit of the three-way adapter is not plugged up; it’s left open, and the vapour can travel into the next piece of glassware, which is the condenser.
The condenser is where the hot vapour is cooled back into a liquid. In order to cool the hot vapour, we’re going to need something cool. Water will work, but we can’t just wrap the inside tube of the condenser (where the vapour travels) with a layer of water that doesn’t move or is never changed. The water would heat up pretty quickly, and then once it was hot it wouldn’t be able to cool the vapour anymore. We need to introduce a slow trickle of cool tap water through the condenser. We can do this by running a rubber tube from the faucet to the stub on the right-hand side of the condenser.
This cool water runs uphill (towards the left-hand side of the condenser) through the outer jacket of the condenser. This outer jacket of glass surrounds the inner tube, which is where the vapour travels. As the vapour enters the left side of the condenser, it’s surrounded by a jacket of cold glass – cold, because the water is cold. The vapour gives up its heat to the water, which turns the vapour into a liquid. The warmed water then exits the condenser using the left-hand stub of the outer jacket, and the newly-condensed liquid dribbles down-hill through the condenser towards the receiving flask.
By constantly running a fresh stream of cool water through the condenser (from the tap to the condenser to the sink drain), we can provide a jacket for the inner tube that is always cool. We don’t need a lot of water pressure, just enough for a slow trickle through the exit tube.
The condensed vapour travels down, now in a liquid form, to the receiving flask. There, it drips down and is collected. Once all of the first liquid has been heated into a vapour, travelled through the condenser, and dripped into the receiving flask, we’ll continue to heat. Nothing will happen for a while, because all of the heat we’re supplying is working to heat up the flask. Once we see that the first liquid has stopped coming over, we can switch out the receiving flask for a fresh receiving flask. Stopper this old flask, and label it as “Liquid #1”. Congratulations, you have now purified Liquid #1!
Once the still pot reaches the boiling point of Liquid #2, you’ll see a puff of vapour – the “vapour ring” start to rise up into the three-way adapter. The thermometers temperature reading will shoot up to the boiling point of Liquid #2, and the #2 vapour will travel over to the condenser. As it turns into a liquid, it’ll drip into your new flask. You can keep going until virtually all the liquid is gone, and then stop the heat. Stopper the second flask, and label it “Liquid #2”. Congratulations, you have now purified Liquid #2, and the distillation is over! You can tell your boss that you’re done, and the customer will be pleased with your work.
This is the simplest form of distillation, and chemists often refer to it like that – “simple distillation”. If you have a more complex mixture, or if the boiling points of the liquids are a little too close together to be effectively separated by simple distillation, there are some modifications you can make. You can add a column of glass between the still pot and the three-way adapter, which gives the vapour more surface area. This can help you when the boiling points of your liquids are close together. You may find that you end up using five collection flasks, or even ten. You collect fractions of the total liquid at a time. This type of setup is called “fractional distillation”, and the additional glassware is called a “fractionating column”.
Sometimes the liquids may be temperature sensitive. Let’s say that your desired liquid has a boiling point of 150°C, but the molecule decomposes if the temperature goes above 100°C. That’s a problem! Distillation means that you have to boil it in order to separate it, but it’s not going to survive those temperatures. One thing you can do is attach a vacuum hose to the receiving flask and use a vacuum pump to lower the pressure inside the distillation setup. Remember from the beginning: a liquid starts to boil when its vapour pressure (determined by the heat) equals the atmospheric pressure. Because we can’t raise the vapour pressure very much by adding heat (the material might decompose, in this case), one thing we can do is to lower the atmospheric pressure by attaching the vacuum pump. This means that our liquid which has a boiling point of 150°C at normal atmospheric pressure could boil at 75°C when under a vacuum.
Since it doesn’t decompose until 100°C, we can now safely distil! This type of distillation is called a “vacuum distillation”. It’s often combined with the fractionating column for very complex cases, in which case you have a vacuum fractional distillation.
Now that you know the various types of distillations, and how / why the process works, was it worth the effort? It definitely was! Distillation is a procedure that’s performed thousands of times, every day, across the world. Some people ferment grain to produce drinking alcohol. Fermentation can’t go much above 10% alcohol / 90% water – about the strength of a very strong beer – because higher amounts kill the yeast that’s used in the fermentation process. After fermentation is over, a distillation can concentrate the drinking alcohol to 40% alcohol / 60% water – the strength of whiskey, vodka, tequila, and other adult beverages.
If you live by the coastline, you can take seawater and purify it using distillation to get water that people can drink. This process of removing salts, or “desalination”, provides people with ready access to pure drinking water. If you’re ever in the store and you go to the aisle with the bottled water, you can probably find jugs of “distilled water” for sale. This is highly purified water that’s gone through the distillation process and doesn’t have the weird taste that tap water can sometimes have.
Probably the most important use of distillation in our modern world is in the oil industry. Oil refineries turn crude petroleum oil into a rich mixture of very valuable compounds – natural gas, kerosene, petrol/gasoline, jet fuel, heating fuel, diesel, waxes for lip balms. This complex mixture is purified by vacuum fractional distillation! All of these valuable products that supply us with the energy to power our cars and planes, and heat our homes, are made possible through the process of distillation.
As a chemist, it’s a safe bet that one day, you’re going to be asked to perform a distillation. You’re going to have to use some large glassware, and it’s going to take a little bit of work, but don’t worry – now, you know exactly what to do. Have fun in the lab!


Member discussion